Need fast iterations with hot reload, debugging, and collaboration over k8s envs?
Docker images are a fundamental building block in modern software development and deployment. Docker images need to be stored somewhere, and that place is the registry. you might be used to using DockerHub, Amazon ECR, Google’s GCR [or now Artifact Registry], among many other managed repositories. Or maybe you are self hosting and using something like Docker Registry, Harbor or JFrog Artifactory. No matter what you chose, you will want to keep it clean - delete old tags and images and reclaim used storage space. The managed platforms offer some kind of functionality themselves, but if you are self-hosting (and using Docker Registry specifically), it isn’t quite obvious how to do it well.
In this blog post, we'll cover what exactly *is* an image registry, the key terminology associated with it, and when hosting your own image registry is advantageous. We'll dive into Docker Distribution, a popular open-source image registry implementation we're using, its structure and garbage collection, and most importantly - explain why we decided to use a different approach when it comes to cleaning it up.
## What is an image registry?
An image registry is a server where Docker or OCI images are stored and managed. It acts as a hub for developers and DevOps teams to share, distribute, and access container images, enabling efficient and consistent deployments.
## Terminology
Before we dive into the details of image registries, let's take a quick look at some key terminology.
- **Image**: An image is a standalone package that contains all the necessary code, dependencies, and configuration required to run a specific application. An image is implemented using layers and a manifest file describing them.
- **Repository**: A repository is a logical grouping of related Docker images within a registry.
- **Manifest**: A manifest is a JSON metadata file stored as a blob associated with a Docker image that describes its contents, layers, and configurations.
- **Tag**: A tag is a human-readable label assigned to a specific version or variant of a Docker image within a repository. Basically, it's a reference file containing the digest of a manifest. A manifest can have multiple tags.
- **Layer**: A layer is a read-only, immutable portion of a Docker image that represents an individual filesystem change. Layers are stacked to construct the complete image, enabling efficient storage and image reuse. Layers are stored in the registry as blobs.
- **Blob**: A blob is the binary data that constitutes a single layer within a Docker image. Basically a "file" identified a digest, used to describe a manifest or a layer.
- **Digest**: A digest is a unique identifier generated from the content of an image's manifest or layer. It serves as a fingerprint for the image, allowing secure verification and ensuring the image's integrity during distribution and retrieval.
## Why host your own image registry?
First of all, because you can, if you want to. But also, maybe your organization has specific security, intellectual property, concerns, or a unique usage pattern. You might not want your images all over Docker Hub, or don’t feel like paying the extra cash for a fully managed image registry.
## Docker Distribution
One popular open-source implementation of an image registry is part of [Docker's Distribution project](https://github.com/distribution/distribution). It comes with a simple and easy-to-configure private image registry. It supports multiple storage options like local filesystem, Amazon S3, Google cloud storage, Azure blob storage and more. Interestingly, the Docker Registry includes a built-in garbage collection tool, but it was not sufficient for our use.
## Example registry structure
Let’s go deeper. This is an example image registry file tree when using Docker Registry. You can see we reference S3 here, but the tree looks the same no matter what storage we use.
```
s3://my-registry/v2/
── blobs/
│ └── sha256/
│ ├── 00/
│ │ ├── 00./
│ │ │ └── data
│ │ └── ...
│ ├── 01/
│ │ ├── 01./
│ │ │ └── data
│ │ └── ...
│ └── ...
└── repositories/
├── my-repo/
│ ├── _manifests/
│ │ ├── revisions/
│ │ │ └── sha256/
│ │ │ ├── 00./
│ │ │ │ └── link -> sha256:abc123...
│ │ │ ├── 01./
│ │ │ │ └── link -> sha256:def456...
│ │ │ └── ...
│ │ └── tags/
│ │ ├── latest/
│ │ │ ├── current/
│ │ │ │ └── link -> sha256:ghi789...
│ │ │ ├── index/
│ │ │ │ └── sha256/
│ │ │ │ ├── ghi789./
│ │ │ │ │ └── link -> sha256:ghi789...
│ │ │ │ └── ...
│ │ ├── v1/
│ │ │ └── ...
│ │ └── ...
│ ├── _layers/
│ │ └── sha256/
│ │ ├── 00./
│ │ │ └── link -> sha256:abc123...
│ │ ├── 01./
│ │ │ └── link -> sha256:def456...
│ │ └── ...
│ └── uploads/
│ └── ...
└── ...
```
So as you can see, it’s all just files, really. A tag would be a file in a path of type: `<root>/v2/repositories/<name>/_manifests/tags/<tag>/current/link` . The link file will contain the string: `sha256:<manifest digest>` which will have the corresponding manifest path: `<root>/v2/repositories/<name>/_manifests/revisions/<algorithm>/<hex digest>/link` . This link file will contain the string: `sha256:<blob digest>` which will lead us to the corresponding blob: `<root>/v2/blobs/<algorithm>/<first two hex bytes of digest>/<hex digest>/data` , which will contain the actual JSON manifest file.
Same goes for the layer in path: `<root>/v2/repositories/<name>/_layers/<algorithm>/<hex digest>/link` , holding the digest for a blob.
## Mandatory clean-up
With great images come great storage costs, and managing an image registry requires some form of a cleaning routine to get rid of unnecessary blobs or manifests that are not referenced by any tags.
At Raftt, we provide fully managed image registries for our users as part of the image building feature of our managed Kubernetes developer environment solution. This allows developers to build images as needed by their environment without having docker installed locally, or having to figure out how to get these images to run on their cluster. We tag images of users based on the environment an image was built in, and the workload running with this container. This scheme requires a lot of tags that accumulate very quickly, and because environments may be short lived, there is a lot of churn. The same goes for unnecessary manifests, layers and their matching blobs. Artifacts that are coupled with ephemeral dev environments “expire” quickly and need to be cleaned up.
Since tags are human-readable and are designed by our application, so our application layer is responsible for deleting them once it is possible. The registry’s garbage collection comes after, and is in charge of deleting no longer referenced manifests and layers.
## How the Docker Distribution (Registry) GC works
The garbage collector works in a method called “mark and sweep”. The mark stage is where the garbage collector iterates over every manifest and marks the corresponding blob (having the same digest). The sweep stage is where the garbage collector iterates over all blobs, and if the blob has not been marked, it adds it to a delete set and then later remove every blob in the delete set.
This is overall a decent solution, but it comes with two caveats:
1. The image registry must be configured in `readonly` mode, so no writes can occur while the garbage collection is running. This makes sense, as otherwise the garbage collection could delete objects while they are being written.
2. The `delete` option must be enabled. This serves as an explicit opt-in to objects being deleted from the storage. As deletion is irreversible, this is a good safety measure.
Together, this means that using the OOTB garbage collection requires modifying the registry’s configuration and then running a special job that performs the garbage collection itself. During this time, the registry is read-only, so image builds that push to the registry must be paused or disabled.
The mechanism itself works like this (assuming you specify the `--remove-untagged` flag): For every manifest in the mark stage, the garbage collector fetches all the tags in the repository and for every tag, checks whether it references the current manifest. If not, it will be added later to a delete set which will be later deleted in the sweep stage.
Just for fun, let's try to estimate how long this would take. So according to the algorithm described, we can estimate that the runtime formula for the mark stage would be: `manifest * tags * s3ApiCallTime`. Assuming a relatively small registry with 1000 manifests and 2000 tags, and assuming it takes around 0.1 seconds read from the storage, we get to a run time of around `1,000*2,000*0.1s=200,000s=~55.5h` which is an extremely long time for our registry to be disabled. Note that this isn’t even counting the `delete` stage (which is luckily more efficient).
## Ephemeral environments and dynamic cluster usage
We’re using Docker Distribution for image registry and using the garbage collection that comes with it felt like the natural thing to do. Since we have a pretty large amount of tags (ephemeral environments and so forth), we needed to find a way to run the garbage collection in way that minimizes the user impact. Most importantly, it should complete quickly. If it takes a reasonable amount of time, we can run it overnight, or whenever no development environments are being used. Since we already had a couple registries that hadn’t been cleaned up in a long time, we knew our first run would take a while, but that is something we thought we could handle manually.
We figured that we could manually remove a lot of the unnecessary tags, it would shrink the repository enough so the garbage collection would finish quickly, and from then on, maintaining it would be easy. We ran the registry garbage collection in dry run mode, but even after 48 hours, it never reached the sweep stage. Given the back of the envelope calculation above, this makes sense…
## A better algorithm
After trying all sorts of methods to manually reduce the run time of the garbage collection with no real luck (still took too long), we started searching for alternatives. We came across a repository called `docker-distribution-pruner` [in Gitlab](https://gitlab.com/gitlab-org/docker-distribution-pruner) doing pretty much exactly what we need! It had a preface that it is experimental and and should only be used for experimental data. Sounds exciting, so we went for it. This repository uses the “mark and sweep” method, but a bit differently.
It first starts with a walking stage where it iterates over all repositories and blobs and keeps their metadata in-memory using maps while downloading the link files of tags, manifests and layers. The next stage is marking, pretty similar to Docker Distribution: go over every tag and mark it. Then go over every manifest and mark it. Then read the layers in the blob of the manifest and mark them as well. Finally, go over every layer in the layers path and mark it as well. Downloaded info is cached so that files are not downloaded more than once, and the marking stage is performed in linear time: `tags + manifests + layers`. Assuming 20 layers per image, using the same numbers as before, we would get something like `(2000+1000+20*1000)0.1s=2300s=38m`, which is much more reasonable!
The next stage is sweeping, where the garbage collector will get rid of invalid tags and old tags (if the `--delete-old-tag-versions` is given). Then go over every manifest and delete the manifest reference if not marked. Same goes for every layer, and then every blob.
There are some other nice (experimental) flags as well: soft delete instead of deleting (which basically moves the files to a backup directory instead) and parallelization of the walking stage which can reduce the time by another 10x or more.
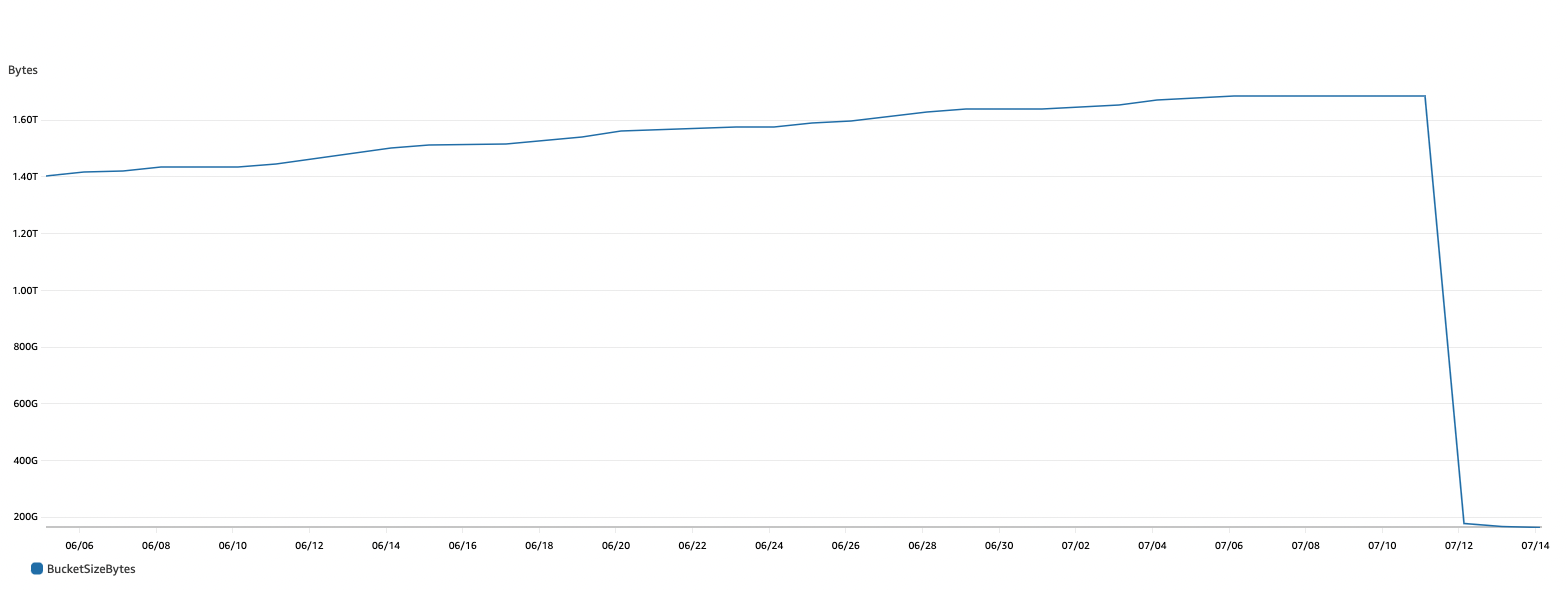
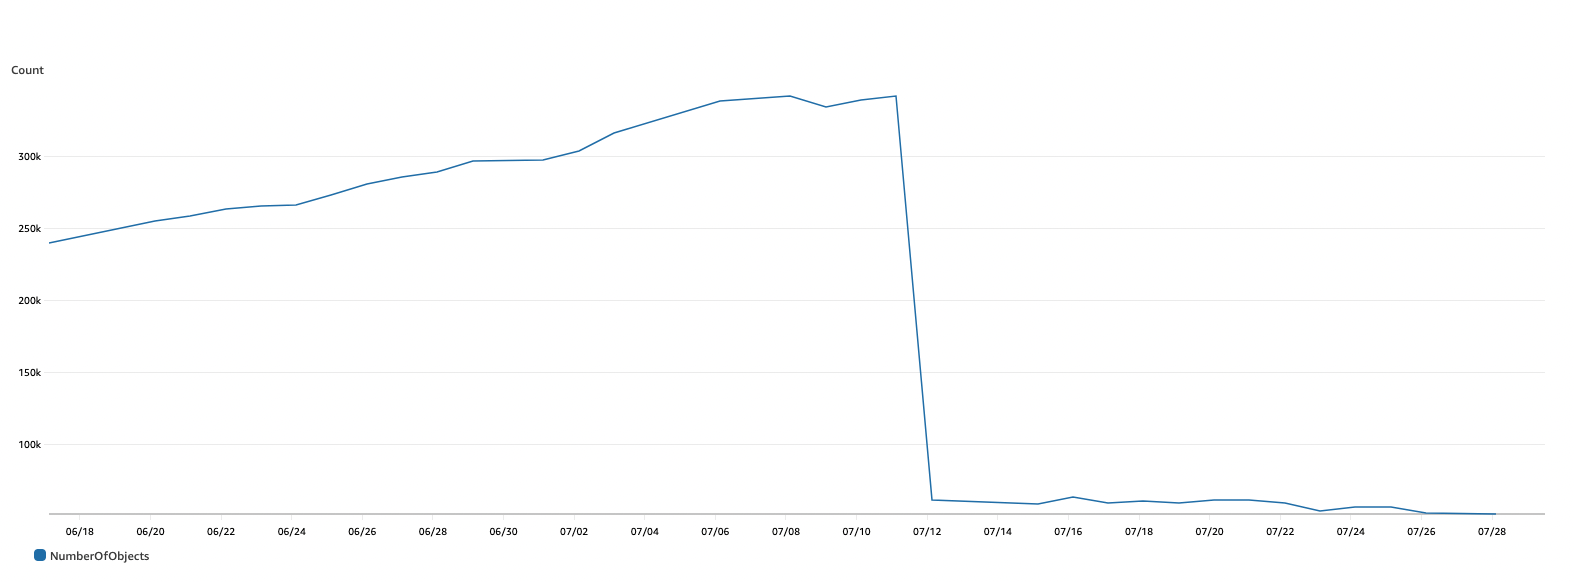
We used this repository after tweaking it a little to fit our needs and performing some tests and dry-runs and the result were, not bad at all. Having almost all of our image registries finish cleanups in less than 4 hours, including the first run, and taking usually around 15 minutes on subsequent runs!
## Conclusion
Private image registries require cleanup. If you’re using the Docker Registry and you don’t have too many images, the built-in cleanup should work pretty well for you. If it doesn’t, we recommend checking out the [docker-distribution-pruner](https://gitlab.com/gitlab-org/docker-distribution-pruner) (carefully, since it is in experimental mode).

Stop wasting time worrying about your dev env.
Concentrate on your code.
The ability to focus on doing what you love best can be more than a bottled-up desire lost in a sea of frustration. Make it a reality — with Raftt.